How to Build a Resurrection Garden Using Raised Garden Beds
A resurrection garden offers a meaningful way to celebrate Easter with your family. This living display tells the story of Jesus Christ’s death and resurrection. Using raised garden beds makes the project easier and more accessible for gardeners of all skill levels.
Raised beds provide better drainage and soil control. They also make it simpler to create the three-dimensional elements that bring this garden to life. Whether you’re creating this display for your home or church, the process can be both spiritually rewarding and enjoyable.
Understanding the Resurrection Garden Concept
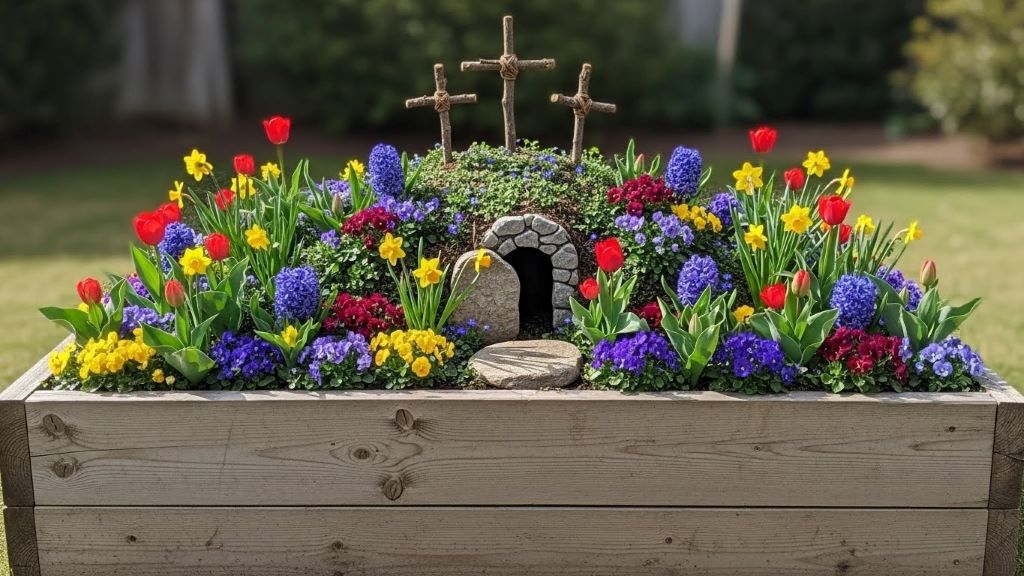
The resurrection garden recreates the scene of Christ’s tomb on Easter morning. Traditional elements include a tomb, three crosses, and a stone rolled away from the entrance. Additionally, you’ll find plants and flowers that represent new life and hope.
These gardens serve as teaching tools for children. They help young ones visualize the Easter story in a tangible way. Moreover, they create a focal point for reflection during the Lenten season and Easter celebrations.
Choosing the Right Raised Garden Bed
Selecting an appropriate raised bed is your first crucial step. The bed should be at least 24 inches wide and 12 inches deep. This size provides enough space to create hills and valleys that add dimension to your scene.
Wooden raised beds work particularly well for this project. They blend naturally with the garden aesthetic. However, metal or composite materials also function effectively if you already have them available.
Consider the bed’s location carefully. Choose a spot that receives partial sunlight and remains visible from your main gathering areas. Therefore, placement near a patio or walkway often works best.
Gathering Your Materials and Supplies
Before starting construction, assemble all necessary materials. You’ll need potting soil, small rocks or pebbles, and moss or ground cover plants. Additionally, gather sticks for crosses and a small clay pot or container for the tomb.
Purchase spring-flowering plants like pansies, violas, or primroses. These add color and represent new life. Succulents also work well because they require minimal maintenance.
You’ll also need basic gardening tools. A small trowel, garden gloves, and a watering can are essential. Furthermore, having landscape fabric underneath helps with drainage and weed control.
Creating the Landscape Foundation
Start by filling your raised bed with high-quality potting soil. Leave about two inches from the top edge. This space allows you to build up hills without soil spilling over.
Shape the soil to create a small hill on one side. This represents Golgotha, where the crucifixion took place. Pat the soil firmly to help it hold its shape. However, don’t compress it so much that drainage suffers.
Create a gentle slope leading down from the hill. This adds visual interest and depth to your garden. Additionally, it helps guide the eye through the entire scene.
Building the Tomb Structure
The tomb serves as the garden’s centerpiece. Use a small terracotta pot laid on its side for a simple tomb. Alternatively, stack flat stones to create a cave-like opening.
Position the tomb at ground level or slightly elevated. Press it into the soil so it appears stable and permanent. Make sure the opening faces outward where viewers can see inside.
Create a pathway leading to the tomb using small pebbles or stones. This detail adds realism and helps tell the story. Moreover, it gives the eye a natural path to follow through the garden.
Constructing the Three Crosses
The three crosses represent Calvary’s most recognizable symbol. Use three straight twigs or small branches of varying heights. The center cross should stand tallest, representing Christ.
Bind the crosses together using twine, wire, or hot glue. Make sure they’re sturdy enough to stand upright in the soil. Position them on your hill in a row, with the tallest in the middle.
Push each cross firmly into the soil. They should stand without additional support. However, if they seem unstable, you can add small rocks around the base for reinforcement.
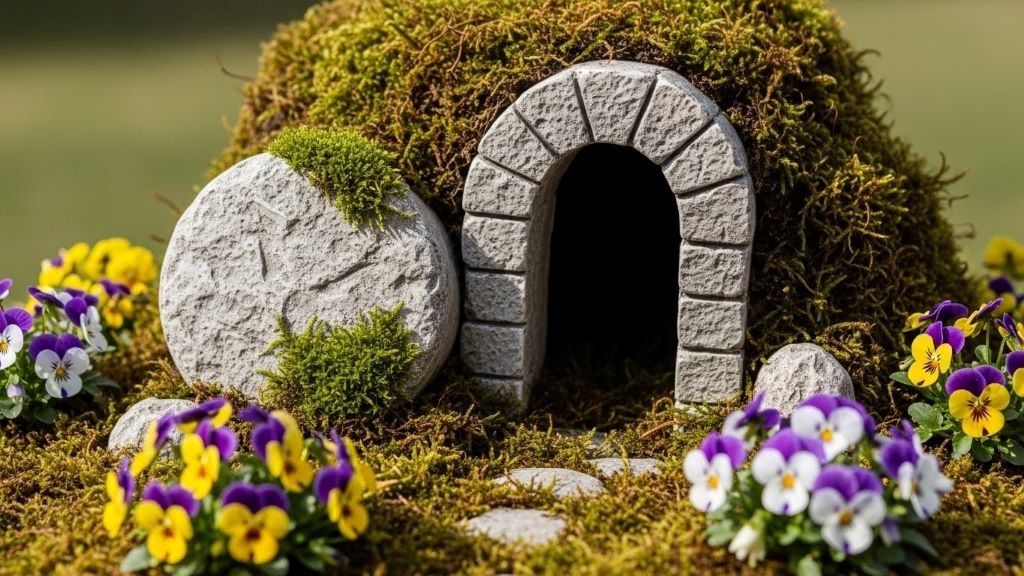
Adding the Rolled-Away Stone
The rolled stone represents the empty tomb and completed resurrection. Find a rock slightly larger than your tomb opening. Position it beside the entrance rather than blocking it.
This detail carries significant symbolic meaning. It shows that death has been conquered and the tomb stands empty. Therefore, take care to position it where it’s clearly visible.
You can paint the stone white or leave it natural. Some gardeners add a small sign saying “He is Risen” nearby. These touches enhance the garden’s message.
Selecting and Planting Flowers
Choose flowers that bloom during the Easter season. Pansies offer vibrant colors and hardy growth. Violas provide delicate beauty, while primroses add cheerful blooms.
Plant flowers around the edges and in front of the tomb. Avoid overcrowding the main elements. The plants should enhance rather than obscure the story elements.
Consider adding symbolic plants. White flowers represent purity and resurrection. Purple blooms symbolize royalty and Christ’s kingship. Additionally, yellow flowers suggest joy and celebration.
Adding Ground Cover and Moss
Moss creates a natural, aged appearance. It makes the garden look like an ancient holy site. Press moss gently around rocks, the tomb entrance, and at the cross bases.
Ground cover plants like creeping thyme work beautifully. They fill empty spaces without overwhelming the scene. Moreover, they release pleasant fragrances when brushed against.
According to gardening experts at Better Homes & Gardens, ground covers help suppress weeds while adding texture. This makes maintenance easier throughout the Easter season.
Incorporating Decorative Elements
Small details bring your resurrection garden to life. Add tiny pebbles to create realistic pathways. Place a few larger rocks to suggest a rocky hillside.
Some gardeners include small figurines depicting biblical scenes. While not necessary, these can help younger children connect with the story. However, keep decorations simple and meaningful rather than cluttered.
Consider adding a small shepherd’s staff or crown of thorns replica. These symbols deepen the garden’s spiritual significance. Place them thoughtfully where they complement rather than distract.
Maintaining Your Resurrection Garden
Water your garden regularly but avoid overwatering. Raised beds drain quickly, so check soil moisture daily. The soil should feel slightly moist one inch below the surface.
Deadhead spent flowers to encourage new blooms. This keeps your garden looking fresh throughout the Easter season. Additionally, remove any weeds that appear promptly.
If plants begin to outgrow their space, trim them back gently. The goal is maintaining visibility of all key elements. Therefore, don’t let foliage obscure the crosses or tomb.
Teaching Opportunities with Your Garden
Use your resurrection garden as an educational tool. Walk children through each element, explaining its significance. Ask questions that encourage them to think about the Easter story.
Read relevant Bible passages while sitting beside the garden. This creates powerful connections between scripture and visual representation. Moreover, it makes abstract concepts more concrete for young minds.
According to The Washington Post’s parenting section, hands-on religious education activities help children retain spiritual lessons better than passive learning. A resurrection garden provides exactly this type of interactive experience.
Adapting for Different Spaces
Not everyone has room for a large raised bed. Smaller versions work equally well in compact spaces. Use a shallow container or even a large planter for apartment balconies.
Desktop versions can sit on a windowsill or table. These miniature gardens use succulent plants and tiny decorative elements. However, they carry the same spiritual significance as larger displays.
Community gardens or church grounds can accommodate larger, more elaborate versions. These become gathering places for reflection and prayer. Additionally, they serve multiple families and strengthen community bonds.
Conclusion
Building a resurrection garden using raised garden beds creates a meaningful Easter tradition. This project combines gardening skills with spiritual reflection. The raised bed format makes construction manageable while providing excellent growing conditions.
Your garden will serve as a visual reminder of Christ’s sacrifice and triumph over death. It offers teaching opportunities for children and meditation space for adults. Moreover, it beautifies your outdoor space with seasonal flowers and thoughtful design.
Start planning your resurrection garden today. Gather your materials, choose your location, and begin creating this powerful symbol of faith and renewal.
Frequently Asked Questions
When should I start building my resurrection garden?
Begin construction two to three weeks before Easter. This timing allows plants to establish roots and start blooming. Additionally, it gives you time to adjust elements before the holiday arrives.
Can I reuse my raised bed for other plantings after Easter?
Yes, absolutely. Remove the symbolic elements and use the bed for vegetables, herbs, or annual flowers. The soil and structure remain perfect for any gardening project throughout the growing season.
What flowers work best if I live in a cold climate?
Choose cold-hardy options like pansies, violas, and ornamental kale. These plants tolerate late frosts and cool temperatures. Alternatively, use artificial flowers if your area experiences harsh early spring weather.
How do I make the crosses weatherproof?
Seal wooden crosses with outdoor polyurethane or varnish. This protects them from moisture and extends their lifespan. You can also use metal stakes or PVC pipe painted to look like wood for permanent installations.
Can children help build a resurrection garden?
Definitely. Children can plant flowers, arrange stones, and help create the landscape. Supervise the construction of crosses and tomb elements. This involvement makes the Easter story more memorable and meaningful for young participants.
Related Topics:
From Bloom to Bounty: A Comprehensive Guide to Collecting Snapdragon Seeds
The Perpetual Salad Bowl: Mastering the Art of Cutting Lettuce for Continuous Growth